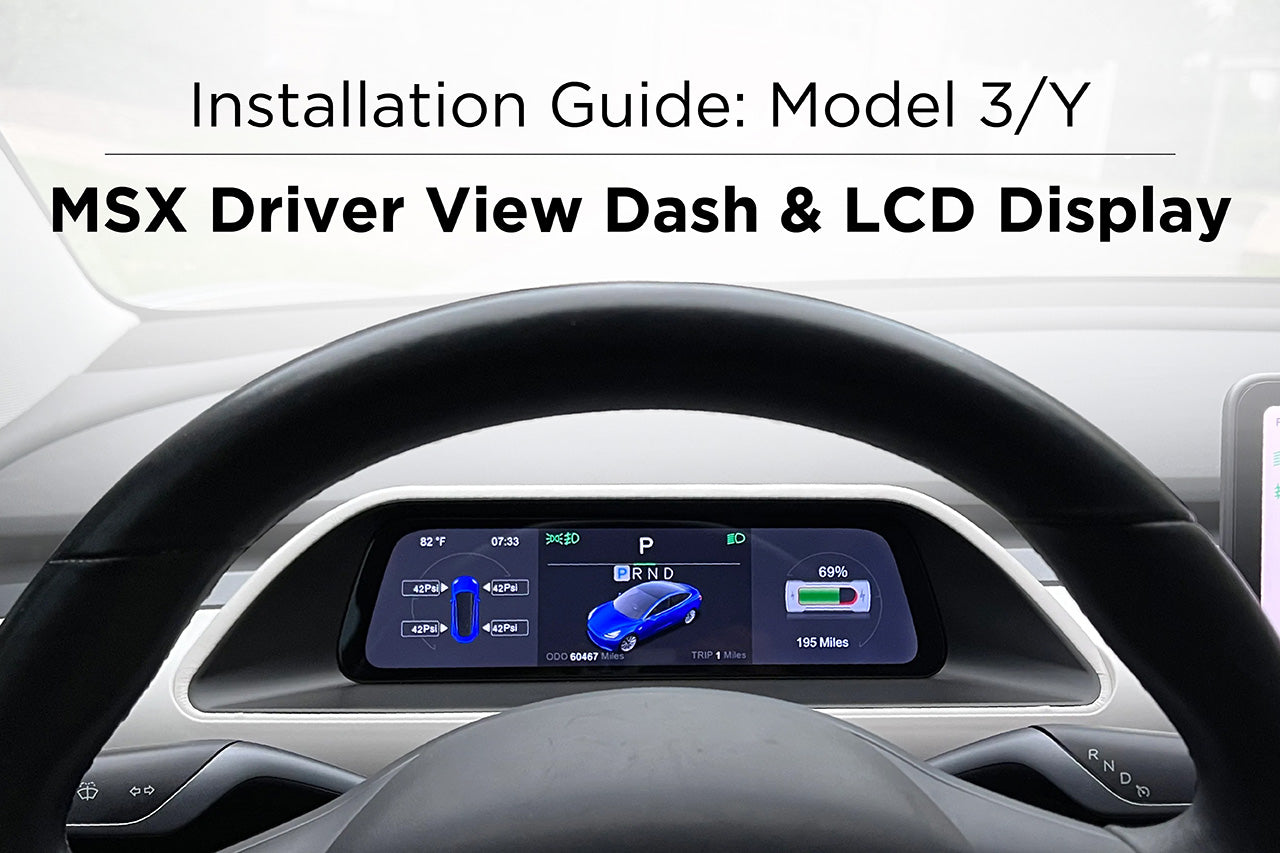
Click to see the Tesla Model 3 & Y MSX Driver View Dash & LCD Display (Smart Instrument Cluster)
The T Sportline Tesla Model 3 & Y MSX Driver View Dash & LCD Display brings essential vehicle information right in front of you. The MSX dash design was inspired by the refreshed Model S / X driver instrument panel, thus the name M-S-X. Unlike other odd looking aftermarket displays, the T Sportline MSX dash blends seamlessly with the Model 3 and Y with the same look, shape, and position proven on the Model S and X. The fit and finish is high quality, matching the OEM design elements and utilizing the factory Tesla dash mounting features.
INSTRUCTIONS
(Updated August 9, 2022)
Before you begin, turn your Tesla 'off'. You can do this by navigating on the center screen to "Safety" then click "Power Off".

1 – Work on a clean surface, preferably using a soft towel or blanket on the surface so you don’t scratch the dash components.
2 - Connect the main two dash sections. The section with the screen will slide into the other section by dropping the mating edge down into the joint at an angle. Align the bolt holes and carefully move the sections together. The pieces are designed to mate together.
3 – Once the sections are connected, press the silver trim piece in place between the two dash sections, from the topside, pressing into the joint between the connected dash sections. The trim piece will press flush into place.
4 - Carefully flip the assembled dash over so the bottom side is facing up. Install 4 included assembly screws into the dash mating joint locations and tighten. Be careful not to over-tighten the screws.
5 – Moving to the car, remove the factory dashboard. Start by removing the dash end caps. These triangle shaped plastic covers simply pull off. You can use a soft edged tool to pry the caps edge up, then use your fingers to pull the caps up. The caps pull straight out. Do not bend the caps. Repeat on both passenger and driver sides.
6 – On the passenger side, pull the A-pillar trim piece off. This is the small curved rectangular trim piece between the dash and the door. It pulls off starting on the top edge, and then lifts up and out from the bottom.
7 – Pull the dash edge trim pieces off. These are small hard plastic trim pieces on the edge of the colored dash section. These are tight and require strong force to pull off. Again, pull them straight out toward the door. A pop or snap noise when removing is normal. Repeat on both driver and passenger sides. Avoid using screwdrivers or sharp edged tools that could damage the parts.
8 – Remove the front edge of the dash. This is the part that sits right behind the center screen and extends across the whole dash. This part can be pulled up, and then out. Start by pulling up on the front edge, it will pop loose. Rotating it up and lifting it out of the car.
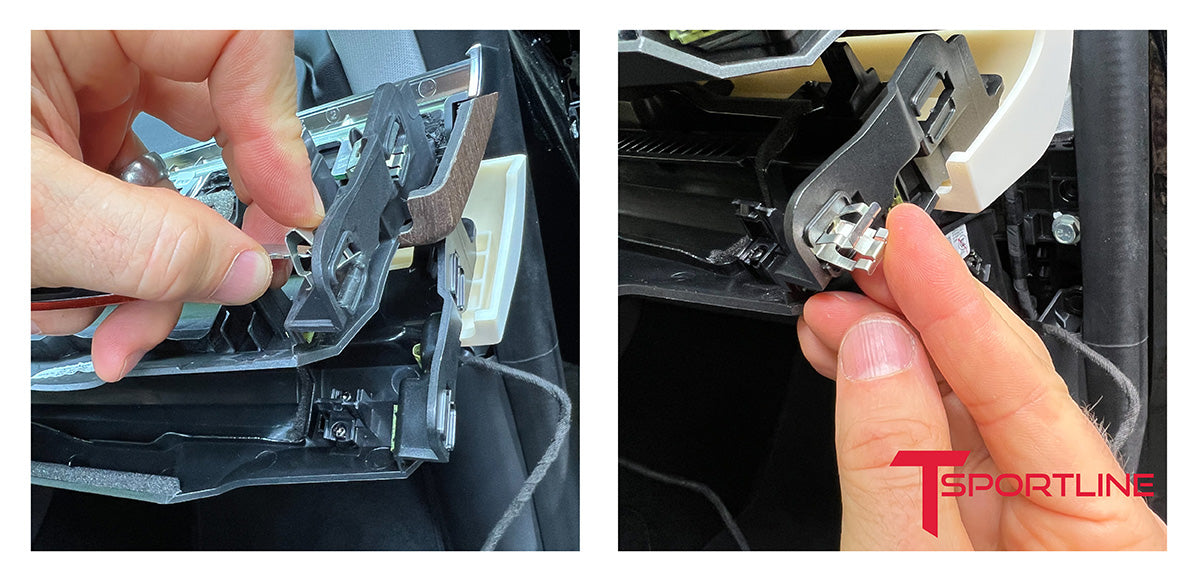
9 – Remove the 4 retaining clips from the ends of the factory dash. These are metal clips that press into place and hold the dash edge trim pieces in place. These clips need removed from the factory dash and pressed into place on the new MSX dash. A small screw driver can be used to pry the clips up and free them from the factory dash. They press into place on the new dash, no tools needed.
10 - Compare the bottom side of the removed factory dash with the bottom side of the new MSX dash. Find the 12 factory mounting tabs on the factory dash. They should match the shape of factory mounting points on the MSX dash. On older models, it may be necessary to use the 6 included hook-loop pieces to match the factory connection points. Most models will match and not require using the 6 extra pieces.
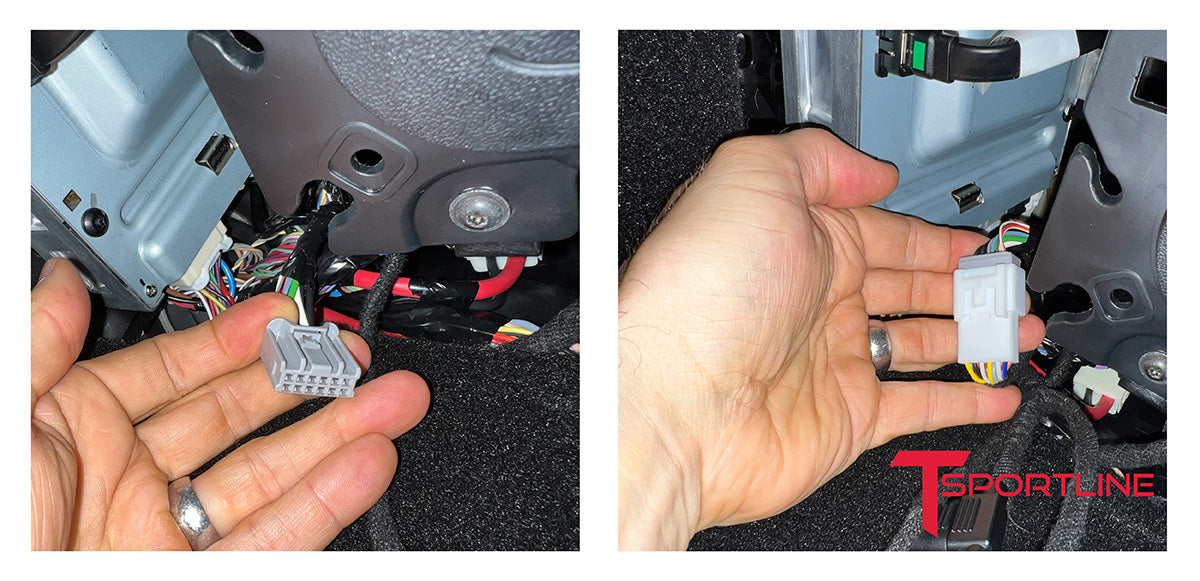
11 – Remove the panel underneath the glove box. The panel is held to the care with 4 plastic push pin fasteners. To remove the push pins, use a small screwdriver to pry the center pin out of the fastener. You can pull the center pins completely out of the fasteners. Once the pins are pulled, the cover will drop down. Be careful because the panel will have two wire cables plugged into it.

12 – Disconnect the wires that are connected to the panel. The connectors will pull out of the speaker and light. Grab the ‘connector’ at the end of the wires. Pull the ‘connector’, not the wires. The connectors will pull out. A small screwdriver can be used to help free the connectors if needed.
13 – Place the MSX dash in the car, with the bottom side facing up, resting on top of the dashboard, behind the center screen.
14 – Preassemble the MSX wire harness by plugging in the included module into the harness. This small black box only connects one way, to one of the white connectors on the harness. Simply plug the harness into the small black box.
15 – Plug the MSX wire harness into the MSX screen. Again, only one connector on the MSX harness matches the connector on the back of the MSX screen. For now, route the remaining wires over the dash to the area between the dash and the passenger door.
16 – There are two versions of cars, older cars with Intel processors and new cars with AMD processors. The MSX dash wire harness installation is different for each processor. Confirm which processor you have by checking the ‘additional vehicle information’ page, under the ‘software’ page on the center screen. The Infotainment Processor will either be Intel or AMD.
INTEL Continue to step 17...
(if you have AMD, skip ahead to AMD section)
17 – First, locate the Intel infotainment computer. It is found in the kick panel of the passenger footwell. The computer is to the right of the glove box. It is not easy to reach or see, since it is up in the kick panel. It is easiest to locate the Intel computer by laying face up, with your head in the footwell under the glove box, looking up into the kick panel area (outside wall of the car). See the photo below.
The middle wire connector will be unplugged from the Intel infotainment computer. The MSX wire harness will plug into the Intel infotainment computer, where the middle wire connector was unplugged. The factory wire connector that was unplugged from the Intel infotainment computer will get plugged back into the MSX harness. Each MSX wire harness connector only works with the correct mating wire connector (so only one MSX cable plug will fit the into the Intel computer plug port)

To unplug the middle wire connector from the Intel infotainment computer, first position yourself within reach of the Intel computer (on your back, facing up) in the passenger kick panel area. This is the area under the dash and in the side panel next to where the passenger feet would be. The computer is not easy to reach! As you look up into the area of the computer, you will notice three main wire connectors. The middle connector is the correct connector. The connector is locked in place with a retaining tab molded into the connector. You must press the tab down, while pulling the connector out. It may be easiest to press the tab down using your right hand, and use your left hand to simultaneously pull the connector out by pushing on the wires. Be patient, this is the most difficult part of the install. Seek help from a smaller handed person who can wiggle up in the area.
Once you’ve disconnected the middle connector, plug the MSX harness connector back into the infotainment computer. Only one connector on the MSX harness fits.

18 - Next, plug the factory harness connector into the MSX harness. This completes the Intel processor plug in.
19 – Next, MSX dash power wire will get routed to and plugged into the cigarette lighter circuit in the center consul.
Use a trim panel pry tool to carefully separate the edge trim from the vehicle center console. Start at the rear, back by the seat. Carefully slide the tool between the console and the console edge trim and pull the trim off the console. You will need to carefully pry at each trim clip location. The trim doesn’t need to be completely removed
(it can be completely removed, which makes the routing a bit easier),, just loosened off the console up past the drink holder area. Once the drink holder retaining bolts (2 on each side) are sufficiently exposed, the trim removal is sufficient.
20 – Holding the trim back, remove the 4 screws holding the center console drink holder section in place. Use the T20 wrench to remove 2 screws on each side.
21 – After all 4 screws are removed, gently and carefully pry the drink holder cover plate up off the console. You may hear pops and snaps as the connectors release. Work your way around the cover as you pull it up. The edges will need to be carefully work up around the edge trim. Pull the edge trim out a little to clear the cover.
22 – Once the cover is removed, disconnect the cigarette lighter power wire connector. A small retaining tab holds the connector in place. Press the tab down and pull the wire connector off.
23 – Route the mating power wire down between the trim and the edge of the drink holder. There is a small gap, just barely wide enough to snake the wire and connector through. Carefully pull the trim away from the drink holder area to fit the connector through.

24 – Plug the Tesla cigarette lighter power wire into the MSX harness. Plug the MSX harness into the factory cigarette lighter. Next, connect the other end of the MSX power wire to the main MSX harness. At this point, the MSX dash will power up. Do not proceed until both the center and MSX screens are on and functioning.
25 – Carefully tuck the excess wire into the cavity under the console cover and pull the excess cable back toward the kick panel. The excess wire and small black MSX control module can be tucked behind the kick panel.
26 – The center console drink holder cover can be pressed back into place, making sure the wires are routed out of the way of the connectors. The cover will snap back to its original position. Once in position, reinstall the 4 retaining T20 screws.
27 – Tuck the power wire up under the console side trim, working its way back to the kick panel area. The center console side trim pieces can now be snapped back into position. Line up the retaining clips and press the trim back in position, working from the front on back to the rear of each trim piece.
28 - You can now turn the Tesla back on (push the brake pedal). Within a couple minutes, the center screen should come back on, and the MSX screen will turn on as well. Once both screens are on, this confirms everything is plugged in correctly. Do not proceed until both screens are on and functioning.
29 – Next you will route the MSX wire harness for installation. Starting near the screen connector, route the MSX harness through the small plastic wall (with foam edge) slot near the connector, so the harness routes close to the front edge of the dash.
30 – Route the MSX harness down the channel between the foam edged wall and front edge of the dash. The harness can be zip tied and or taped to the dash to hold it in place. The USB connector wire will route into the glove box and the main MSX harness wire will route over the edge of the dash and continue into the kick panel area.
31 – With the harness secured to the bottom side of the MSX dash, the dash can be rotated so the top side is facing up.
32 – The MSX dash is slid into position by angling it into location, similar to how the factory dash was rotated out. Once the MSX dash is angled into position, carefully route the main wire through the channel on the side of the vehicle dash. Route the USB wire into the glove box, over the front edge of the vehicle dash.
33 – With the MSX harness positioned properly, the MSX dash can be pressed down on the front edge to secure the retaining clips with the vehicle. Press down all along the front edge. You may hear the clips pop or snap into place, or not – this varies by vehicle. Once the dash is secure, you can carefully tuck the MSX harness into the channels on the edge of the vehicle dash leading to the kick panel area. You can tuck the remaining extra MSX wire harness and small black MSX module into the kick panel area.
34 – Next you will install the dash edge trim pieces. These press into place on the MSX dash, similar to how they pulled off the factory dash. Extra dash edge trim pieces are included, some older models may not have included edge trim.
35 – Next the passenger side a-pillar trim piece is slid back into position and pressed into place. Feed the bottom edge in first, then press the top edge to engage the clip.
36 – Next the triangle side plastic covers are pressed back into place. Similar to how they pulled off, they just press into place. Press over each clip area to ensure they are seated properly.
37 – Next the panel under the glove box will be re-installed. Start by reconnecting the speaker wire and the light wire. The connectors press back into each part.
38 – Slide the panel back into the original position on the car. Press the push pin fasteners into place. Once the pins are in place, press the center pin into the fastener to secure it.
39 – The dash is now installed.
AMD Continue to step 17...
17 – Loosen the kick panel on the passenger side, under the dash on the door side. It won’t need to be completely removed. The top section can be pulled out of the way as shown.
18 – Find the blue connector in the kick panel. The MSX wire harness will plug into the blue connector. Each MSX wire harness connector only works with the correct mating wire connector, only one connector on the MSX wire harness will plug into the blue connector on the Tesla.
19 – Use a trim panel pry tool to carefully separate the edge trim from the vehicle center console. Start at the rear, back by the seat. Carefully slide the tool between the console and the console edge trim and pull the trim off the console. You will need to carefully pry at each trim clip location. The trim doesn’t need to be completely removed (it can be completely removed, which makes the routing a bit easier), just loosened off the console up past the drink holder area. Once the drink holder retaining bolts (2 on each side) are sufficiently exposed, the trim removal is sufficient.
20 – Holding the trim back, remove the 4 screws holding the center console drink holder section in place. Use the T20 wrench to remove 2 screws on each side.
21 – After all 4 screws are removed, gently and carefully pry the drink holder cover plate up off the console. You may hear pops and snaps as the connectors release. Work your way around the cover as you pull it up. The edges will need to be carefully work up around the edge trim. Pull the edge trim out a little to clear the cover.
22 – Once the cover is removed, disconnect the cigarette lighter power wire connector. A small retaining tab holds the connector in place. Press the tab down and pull the wire connector off.
23 – Route the mating power wire down between the trim and the edge of the drink holder. There is a small gap, just barely wide enough to snake the wire and connector through. Carefully pull the trim away from the drink holder area to fit the connector through.
24 – Plug the Tesla cigarette lighter power wire into the MSX harness. Plug the MSX harness into the factory cigarette lighter. Next, connect the other end of the MSX power wire to the main MSX harness.
You can now turn the Tesla back on (push the brake pedal). Within a couple minutes, the center screen should come back on, and the MSX screen will turn on as well. Once both screens are on, this confirms everything is plugged in correctly. Do not proceed until both screens are on and functioning.
25 – Carefully tuck the excess wire into the cavity under the console cover and pull the excess cable back toward the kick panel. The excess wire and small black MSX control module can be tucked behind the kick panel.
26 – The center console drink holder cover can be pressed back into place, making sure the wires are routed out of the way of the connectors. The cover will snap back to its original position. Once in position, reinstall the 4 retaining T20 screws.
27 – Tuck the power wire up under the console side trim, working its way back to the kick panel area. The center console side trim pieces can now be snapped back into position. Line up the retaining clips and press the trim back in position, working from the front on back to the rear of each trim piece.
28 - Next you will route the MSX wire harness for installation. Starting near the screen connector, route the MSX harness through the small plastic wall (with foam edge) slot near the connector, so the harness routes close to the front edge of the dash.
29 – Route the MSX harness down the channel between the foam edged wall and front edge of the dash. The harness can be zip tied and or taped to the dash to hold it in place. The USB connector wire will route into the glove box and the main MSX harness wire will route over the edge of the dash and continue into the kick panel area.
30 – With the harness secured to the bottom side of the MSX dash, the dash can be rotated so the top side is facing up.
31 – The MSX dash is slid into position by angling it into location, similar to how the factory dash was rotated out. Once the MSX dash is angled into position, carefully route the main wire through the channel on the side of the vehicle dash. Route the USB wire into the glove box, over the front edge of the vehicle dash.

32 – With the MSX harness positioned properly, the MSX dash can be pressed down on the front edge to secure the retaining clips with the vehicle. Press down all along the front edge. You may hear the clips pop or snap into place, or not – this varies by vehicle. Once the dash is secure, you can carefully tuck the MSX harness into the channels on the edge of the vehicle dash leading to the kick panel area. You can tuck the remaining extra MSX wire harness and small black MSX module into the kick panel area.
33 – Next you can reinstall the passenger side kick panel. Reverse the steps to remove it, and make sure all the wires are tucked out of the way.
34 – Next you will install the dash edge trim pieces. These press into place on the MSX dash, similar to how they pulled off the factory dash. Extra dash edge trim pieces are included, some older models may not have included edge trim.
35 – Next the passenger side a-pillar trim piece is slide back into position and pressed into place. Feed the bottom edge in first, then press the top edge to engage the clip.
36 – Next the triangle side plastic covers are pressed back into place. Similar to how they pulled off, they just press into place. Press over each clip area to ensure they are seated properly.
37 – Next the panel under the glove box will be re-installed. Start by reconnecting the speaker wire and the light wire. The connectors press back into each part.
38 – Slide the panel back into the original position on the car. Press the push pin fasteners into place. Once the pins are in place, press the center pin into the fastener to secure it.
39 – The dash is now installed.
-----Adjusting the MSX Dash-----
To enter MSX settings: On the steering wheel, hold down the left button and scroll up on the right button.
Use the right button to scroll up or down to specific settings
Press the left button on any setting to adjust the setting. For the time zone setting, the right button will scroll different zones.
Scroll to ‘Exit Menu’ using the right button, and press the left button to exit settings
Settings:
Temperature (C or F)
Time Zone
Time Format
Dimmer (Auto (changes at 5pm, Day – White, Night – Black)
Tire Pressure (Bar or PSI)